

A Stone You Can Scratch With a Fingernail
Talc, the primary mineral in soapstone, defines 1 on the Mohs mineral hardness scale. A human fingernail sits at 2.5, and a standard carbon-steel carving blade sits between 5.5 and 6.5. Because the stone is softer than your own thumbnail, you do not need workshop machinery, power drills, or a heavy bench vice to shape it. A small steel knife and a sheet of sandpaper at your kitchen table are enough to turn a raw block into a crisp personal stamp.
Known in Mandarin as zhuanke, seal carving has accompanied Chinese calligraphy, books, literature, and ink painting for millennia. Those bright vermilion squares pressed onto scroll margins, personal letters, and contemporary artworks carry the maker's identity, a studio name, or a favoured poetic phrase. Across the UK, reclaiming this hands-on heritage craft offers a personal link to that older tradition.
A first-time carver can take a raw soapstone blank from initial sanding to its first stamped cinnabar impression in 90 to 120 minutes. Carving a family surname or a chosen phrase gives you a piece of living heritage made entirely with your own hands.
Your UK Shopping List: Stones, Knives and Cinnabar Paste
Walk into a specialist stationery shop in London or Manchester's Chinatown, and you will often see velvet-lined boxes holding five or six differently shaped chisels. Swapping between five unfamiliar blade widths during your first session only confuses your grip angles. I always advise starting with a single, well-weighted tool and a uniform block of stone.
- Soapstone seal blank: Look for a square Qingtian or Shoushan soapstone blank measuring 20mm by 20mm at the base and 50mm in height. That specific footprint gives you an optimal balance of carving surface and enough height clearance to lock securely inside a wooden clamp.
- One flat-edged carving knife (kedao): Pick a single carbon-steel blade with a 4mm to 5mm flat chisel tip, ideally wrapped in bamboo or cord for grip.
- Wooden seal vice (yinchuang): A small screw-tightened wooden block that holds the stone steady so your fingers stay safely clear of the cutting path.
- Cinnabar seal paste (yinni): Traditional red ink paste blended from castor oil and mugwort fibres, rather than water-based office stamp pads.
- Sanding and transfer essentials: Wet-or-dry silicon carbide sandpaper in 400 and 1000 grit, a 6mm float glass plate (a smooth glass chopping board or picture frame glass works well), a 4B or 6B graphite pencil, tracing paper, a wooden spoon, and a soft dry paintbrush.
You can pick up these items from Chinese art suppliers, UK Chinatown bookshops, or domestic online calligraphy specialists. Ordering specialist oil-based cinnabar paste and raw blanks from domestic UK calligraphy suppliers takes 2 to 5 working days for delivery, compared to 2 to 4 weeks when shipping directly from East Asian studio suppliers. When choosing your blank, hold it up to the light and inspect the base: harder pyrophyllite stones containing quartz or iron pyrite nodules will chip a standard carbon-steel kedao blade and require diamond-grit rotary burrs rather than hand pressure.
Picking Your Characters: Seal Script, Red Text or White Text
Why do the characters on traditional stamps look so different from the print on a modern menu or book cover? Seals use zhuanshu, specifically Small Seal Script (Xiaozhuan), which was standardised during the Qin dynasty around 221 BCE. This ancient script elongates characters into vertical rectangles and replaces sharp square corners with flowing, rounded turns. Because modern simplified or traditional forms rarely match their Qin dynasty ancestors, you must check every character in a printed or digital seal script dictionary before drawing your layout. Verifying a two-character surname or phrase and sketching two or three balanced grid drafts takes 15 to 25 minutes.
Once you have your script forms, you face a fundamental design choice between two classic carving styles:
- Baiwen (intaglio or white text): You trench out the character strokes themselves. When stamped, the recessed grooves stay free of ink, printing crisp white characters on a solid red background.
- Zhuwen (relief or red text): You excavate the entire background surface around the strokes, leaving thin raised lines of stone that print red on white paper.
For a first project, baiwen is far more forgiving. You remove a fraction of the stone compared to relief carving, and you do not risk snapping a delicate raised wall of talc with a stray slip of the knife.
Sanding the Face Flat and Writing Your Design Backwards
Store-bought soapstone blanks arrive coated in a thin layer of factory paraffin wax and frequently carry microscopic saw ridges across the stamping face. If you carve directly into an uneven base, the stamp will never make full contact with the paper. We use a dry graphite burnishing method after flattening the stone, which avoids the smeared boundaries and clogged stone pores caused by wet ink flips or acetone solvent transfers.
- Step 1: True the seal face. Lay your 400-grit silicon carbide sandpaper flat on the 6mm float glass plate. Hold the stone near its base and sand the stamping face using a continuous figure-of-eight motion, rotating the block every few passes so your finger pressure stays completely level. Switch to 1000-grit paper to polish out the scratches. Stripping the paraffin coat and achieving a dead-flat face takes 3 to 5 minutes.
- Step 2: Draft at actual size. Trace the 20mm square base onto a sheet of tracing paper. Draw your Small Seal Script design inside that square border, keeping even margins around the outside and balanced negative space between strokes.
- Step 3: Reverse and burnish. Go over your final lines heavily with a soft 4B or 6B graphite pencil. Flip the tracing paper face-down onto the freshly sanded stone face, holding it taut so it cannot shift. Rub the back of the paper firmly for 2 minutes using the rounded back of a wooden spoon. Lift the paper to reveal a sharp, mirror-image graphite guide bonded directly to the pale stone.
Cutting the Stone: Knife Grip, Stroke Order and Safe Habits
Take a look at a master carver's finished stamp and you will notice the grooves are rough, lively, and faceted rather than laser-smooth. In zhuanke theory, the stone is broken as much as it is sliced. Lock your prepared blank firmly into the wooden seal clamp so the top 10mm protrudes cleanly. Never hold the stone in your bare hand while cutting; one slip on a polished face will send the steel chisel straight into your palm.
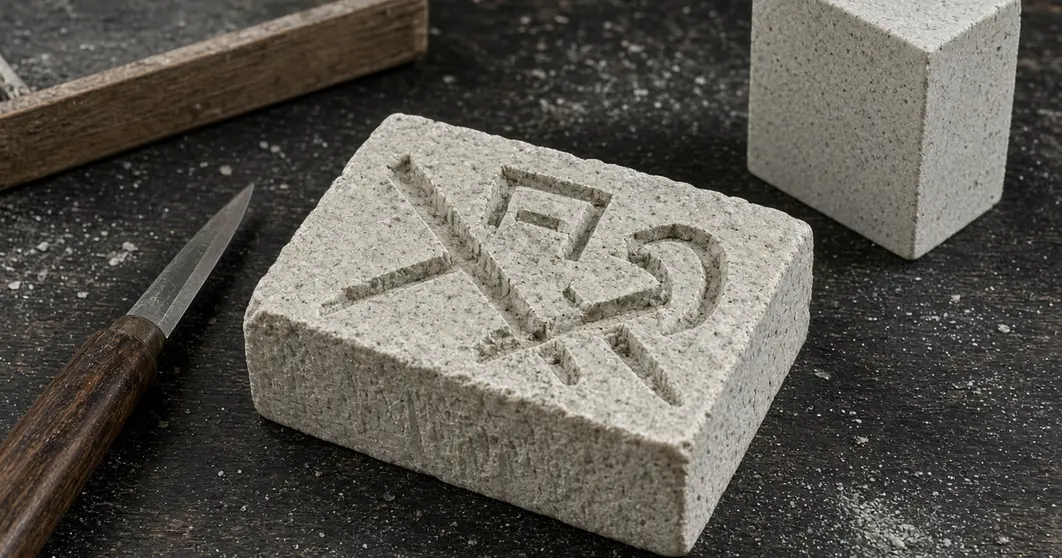
Grip the kedao close to the blade tip, holding the shaft upright like a heavy fountain pen, with your middle and ring fingers braced against the side of the stone or clamp to act as a brake. Carvers rely on two classic knife movements:
- Chongdao (pushing knife): One steady, continuous forward push along the length of the stroke, which shears away stone in a smooth furrow.
- Qiedao (chopping or rocking knife): Short, controlled downward rocking taps that incise the line step by step, giving novices total control without skidding across the smooth surface.
To carve a clean baiwen channel, use a two-pass V-trenching technique. Tilt the knife shaft at a 30-to-45-degree angle against the left edge of your pencilled stroke and cut along the line using short qiedao taps. Rotate the clamp 180 degrees, angle the blade against the opposite edge of the same stroke, and cut back the other way so the two angled cuts meet at the bottom, popping out a neat V-shaped trough of stone to a uniform depth of 1.0mm to 1.5mm. Carving a single five-to-eight-stroke character takes 25 to 40 minutes of active cutting when you pause every 3 to 4 strokes to sweep away the white talc dust with a dry soft bristle brush.
Keep Your Trenches Clear
Resist the urge to blow the powdered talc off the seal face with your breath. Moisture from your mouth mixes with the fine dust to form a gummy paste inside the 1mm grooves, obscuring your pencil lines. Always sweep the channels clean with a dry soft brush.
Pulling a Crisp Cinnabar Print
Once every stroke is trenched out, your seal is ready to meet the ink paste. Standard photocopy paper is too hard and non-absorbent to show the subtle texture of hand-cut stone; pairing traditional castor-oil and mugwort-fibre cinnabar paste with thin absorbent rice paper (xuan paper) over a cushioned backing gives a diagnostic print that reveals every detail of your knife work.
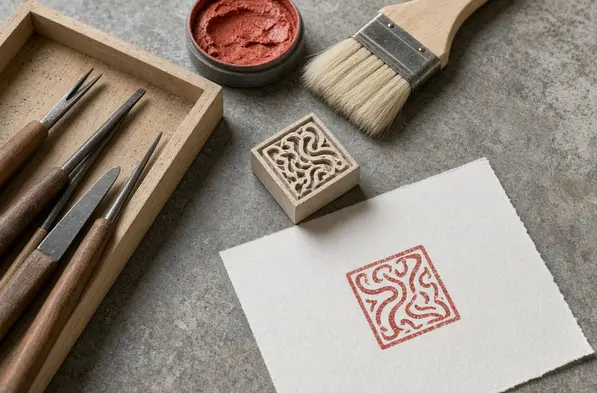
If your yinni paste has been sitting unused, stir it gently with a small bone or plastic spatula to redistribute the castor oil into the fibrous mugwort base, then pat it back into a rounded mound. Hold your carved stone vertically and tap the face lightly into the paste 10 to 15 times. Never mash the stone down or twist it in the pot; light vertical tapping loads a microscopic film of red pigment onto the flat surface without clogging your 1mm trenches.
Lay a sheet of thin xuan paper over a 3mm wool felt pad or a stack of four or five folded paper sheets. Position the inked seal straight down onto the paper and hold firm vertical downward pressure for 3 to 5 seconds, rocking the top of the stone almost imperceptibly to ensure the corners transfer evenly into the paper fibres. Lift the stone straight up. The fresh oil-bound print will take 10 to 20 minutes to set smudge-free at room temperature.
Worked Through: Your Surname as a One-Character White-Text Seal
Let us put the whole process together on a single 20mm square blank using the common Chinese surname 林 (Lin, meaning forest). Its twin 'wood' radicals split the square face into two symmetrical halves, making it an ideal first baiwen project to practise spacing and repetition across a single 45-to-60-minute session.
- Look up and sketch the script: Open your seal script reference to find 林. In Small Seal Script, 林 comprises 8 balanced strokes—two central verticals, two horizontal crossbars, and four downward-sweeping roots. Draw a 20mm square on your tracing paper, mark a 2mm uncarved outer border inside the perimeter, and sketch the twin trees symmetrically within the remaining 16mm space using a 6B pencil.
- Sand and transfer: Spend 4 minutes sanding your 20mm Qingtian blank in a figure-of-eight across 400-grit and then 1000-grit paper on your glass plate. Flip your pencilled 林 sketch face-down onto the stone and burnish the back with your wooden spoon for 2 minutes until the reversed eight-stroke layout transfers sharply.
- Trench the verticals and crossbars: Lock the stone into your wooden clamp. Starting with the two long vertical tree trunks, hold your 4mm flat-edged kedao at a 35-degree angle and rock the blade down the left side of each line using the qiedao method. Spin the clamp 180 degrees and cut the opposing bevel to clear out a 1.2mm V-trench. Brush away the white talc dust, then repeat the two-pass cut on the two horizontal crossbars.
- Carve the sweeping roots: Guide the knife along the four curved downward roots, slowing your rocking motion around the gentle bends so the outside edge of the stroke does not chip into the 2mm outer border.
- Test print and refine: Tap the face 12 times into your cinnabar paste and press it onto xuan paper over your felt pad for 4 seconds. Inspect the white characters against the red square: you will likely see tight pinches where the horizontal crossbars meet the vertical trunks. Put the stone back in the clamp for a 10-minute revision pass, lightly paring back those four intersections and nicking one or two tiny bevels along the outer border to give the red frame an aged, organic stone character before pulling your final crisp impression.




Share Your Opinion